A successor to Bundler [home] [docs], VisualSFM (structure from motion) [home] is a desktop app to calibrate cameras. This article describes installation and usage for a typical stereo recording, using Ubuntu 12.10 64-bit.
VisualSFM requires SiftGPU [home] (which requires CUDA [my guide]), pba [home], pmvs [home], cmvs [home], and graclus [home]. And some Ubuntu packages:
apt-get install libgtk2.0-dev libglew-dev libdevil-dev libboost-all-dev libatlas-cpp-0.6-dev libatlas-dev imagemagick libatlas3gf-base libcminpack-dev libgfortran3 libmetis-edf-dev libparmetis-dev freeglut3-dev libgsl0-dev liblapack-dev liblapacke-dev
Install CUDA from Ubuntu with x-swat drivers [my guide]. Do a mkdir visualsfm, and inside of it download, unzip to vsfm, and make VisualSFM [install]. That is the easiest part, but it cannot do anything. The first one needing CUDA is SiftGPU [home]. Unzip to SiftGPU and edit the makefile before compiling:
cd SiftGPU
nano -w makefile
CUDA_INSTALL_PATH = /usr
make
cp bin/libsiftgpu.so ../vsfm/bin/
The second one needing CUDA is pba [home]. Unzip to pba, then repeat after me:
cd pba
nano -w makefile
CUDA_INSTALL_PATH = /usr
make
cp bin/libpba.so ../vsfm/bin/
And next comes pmvs [home], cmvs [home] and graclus [home]. Rather than use the homepages directly, I use the frenchleaf variant [github]:
git clone https://github.com/TheFrenchLeaf/CMVS-PMVS.git
cd CMVS-PMVS/program
mkdir build && cd build && cmake ..
make
cd main
cp cmvs ../../../../vsfm/bin/
cp pmvs2 ../../../../vsfm/bin/
cp genOption ../../../../vsfm/bin/
Then, one last check that all dependencies are fulfilled:
cd vsfm/bin
clear; for f in *; do (echo $f && ldd $f) |less; done
And now, we are up to running VisualSFM! Have at least 3 images ready.
cd vsfm/bin
export LD_LIBRARY_PATH=.
./VisualSFM
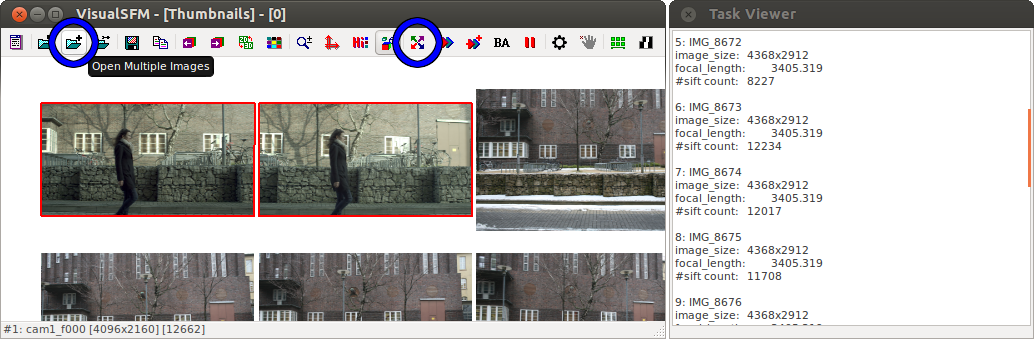
As first action use the "Open Multiple Images" button from the menu bar (3rd from left) to open your 3+ frames.
With the frames available, we compute (in 2D camera space) the SIFT matches between images using "Compute Missing Matches" (the 4-arrow button). To verify that we have all the matches we need, we use Shift+Gallery button (middle of the menu bar, left from the lens button).
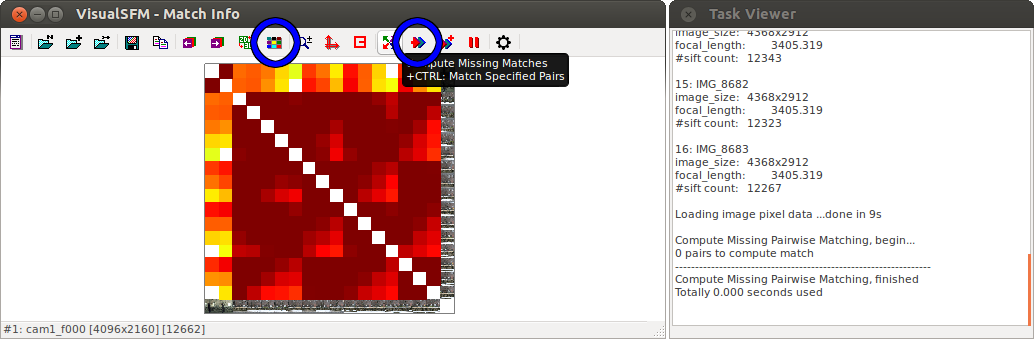
In our case, the leftmost (and uppermost) 2 images are a stereo pair that is supported by the other frames (taken on another day, that is why the matches are comparatively weak). Still, we do have enough SIFT links. Once we have confirmed that, we go on to the 3D (world space) reconstruction, by using "Compute 3D Reconstruction" (the double-arrow button, 4th from right). This gives us the camera calibration and a sparse point cloud.
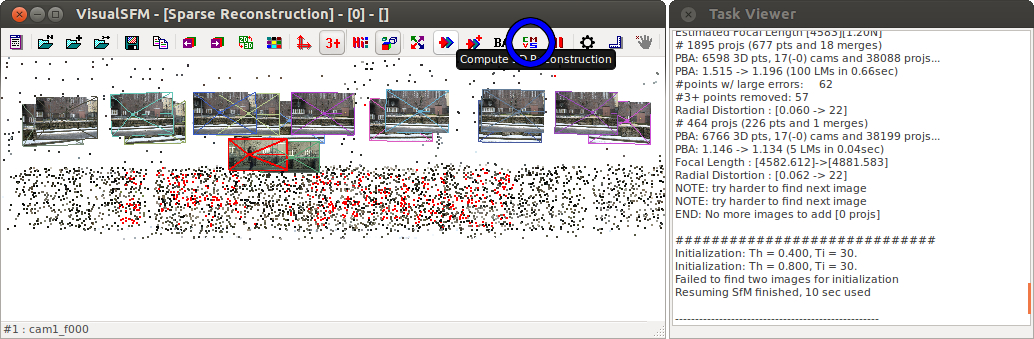
The nicest way to get the camera calibration out to us is to start a dense reconstruction with the "CVMS" button (5th from right in 3D view). After being asked for a directory name to write to (e.g. /tmp/test2), we cd /tmp/test2.nvm.cmvs/00 and have there a bundle.rd.out (compatible with bundle.out of Bundler [my guide]) or a better readable cameras_v2.txt. You can then cancel the CVMS run or, if you are actually interested in a dense model, let it run.
And that was it! For a pure camera calibration, all that is needed is in VisualSFM, and being mostly on GPU it is so much faster than the CPU-bound Bundler. I hope you found this article somewhat useful. Have a good time!
EOF (Feb:2013)